


HDR Photography stands for High Dynamic Range Photography, it is basically a heavy post-processing technique that allows you to take complete control over the tone of a picture which cannot be achieved by normal means.
Lets take an example, you take any normal picture (JPEG/GIF/PNG, etc..) and try to adjust the brightness or contrast of the image using Photoshop or GIMP. You will soon notice that if one part of the picture gets the desired brightness, some other part of the picture will become very bright(overexposed) or very dark(underexposed), because of this you cannot modify the tone of any image to a great extent. HDR targets this problem and tries to give you better control over the tone of your image.
The idea behind HDR photography is to combine multiple pictures of a particular scene into a single image. Each of the source pictures are supposed to have different exposure settings, most of the HDR photos use 3 source images, one underexposed, one overexposed and one with normal exposure. When you combine multiple exposures into a single image, the post-processing software now has a range of exposure to work with (unlike a normal photo which has a fixed exposure value). This will allow the software to adjust the tone in a very different manner with complete control on every part of the image.
Let me take the following images
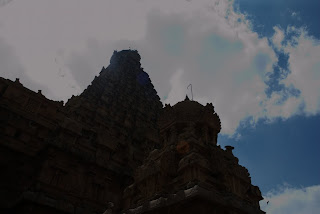 Underexposed Image
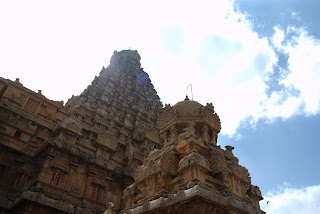 Normal exposure
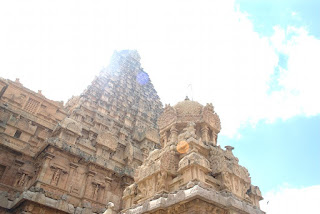 Overexposed Image
All the 3 images represents exactly the same scene.
Now you need a software like PhotoMatix (proprietary) or QtPfsGui (open-source) to chew these images and create a intermediate .HDR file. Now this HDR can be toned with various algorithms in the software and you can produce a variety of tones of the HDR which can be saved as a normal JPEG or PNG. One such tone that I achieved with the above images is

Just look at the details of the temple sculptures and at the same time observe the tone of the clouds, none of the source images can show both of them. When we combine multiple images, we merge the "best" part of every photo which yields a very pleasant image.
You can see lot of good HDR pictures here.
5 comments:
ippidi than oore emathirya software eh vachu.. naan kode un talent oh nu nenachuten :) :)
But this is informative.. thanks :)
Santy, HDR photography is a separate area in digital photography and the process is what i have said in the post..
Ithu oore emathira vela ila, it is like taking the negative using a old camera and processing it.. Digital photographyla instead of chemicals we use software.. avalo than.. :) Even the digi cam that you use is working because of photo editing software..
Informative Ragu!
Btw, when you say exposure levels what exactly should be used? -2/0/+2 or -1/0/+1.
Why not use all 5 levels of exposure?
Can this be direclty done in PS3 or GIMP by over laying layers?
I have read using RAW is more appropriate than JPEG processing. Have you tried it?
Why is there a glow at the end of each subject's borders? Can that be avoided?
I also feel you should say about using a tripod for fixed frame to capture all images. Also the focal and apperature should remain constant when chaning the exposure levels.
Thanks Vijesh.. Nice set of questions and it comes back to the areas which I intentionally ignored to keep the post simple.. :) My answers below:
Q: what exactly should be used? -2/0/+2 or -1/0/+1.
A: There is no fixed/recommended EV for HDR. If you get good details at -1/0/+1EV then you use that setting. Sometimes using -2/0/+2EV may not reveal all the details, so go ahead and use a higher stop. But AFAIK, -2/0/+2 is good enough to reveal all the details.
I remember reading somewhere that if the scene that you are taking is already very bright, then you can also experiment -5/-2/0EV. This will bring down the over brightness resulting in a cooler HDR.
Q:Why not use all 5 levels of exposure?
A: Yes, you can. But when you having ample amount of details with 3 levels, having 5 levels will not make any difference.
Q:Can this be direclty done in PS3 or GIMP by over laying layers?
A: Nope. Layering cannot help us to adjust the tone based on multiple exposure. How can we extract the best from a -2EV shot, 0EV shot and +2EV shot without any visible borders? Have a look at the source images in this post, even if you do extensive layer based editing you cannot achieve that tone and details without any visible borders.
But PS has a HDR plugin that do the same job as Photomatix or Luminance.
Q:I have read using RAW is more appropriate than JPEG processing. Have you tried it?
A: Yes, the HDR in this post and the previous post is made from a RAW file. I used the JPEG approach only for narration purpose :-).
The main problem in processing a JPEG is the alignment of the source images. It is really really tough to take 3 or 5 shots of exactly the same scene. Minor camera shakes and moving objects in the scene will make the alignment very tough.
Most of the HDR softwares can read a RAW file and they can simply generate the .HDR file out of it. When reading a RAW file, the HDR software automatically takes care of generating the source images and merging them. So it becomes easy on us.
Q:Why is there a glow at the end of each subject's borders? Can that be avoided?
A: I noticed that too. The HDR toning algorithm is the culprit here. When generating larger images, there is good amount of noise in the picture. To reduce this noise, I had to adjust some other parameter which caused this glow.I should do a lot of trail and error work on the parameters to make it perfect. If you look at the other HDR in the previous post that glow less visible.
For JPEG mode photographers, you made a nice point on tripod, aperture and focal. I missed that.
Post a Comment